
Json Web Token aka JWT - implementation and uses with SpringBoot2 and SpringBoot3
- Rohit Modi
- Jan 29, 2023
- 4 min read

Hi, a warm welcome to tech-maze, in today's article we will explore how json web token also know as jwt works and how this can be implemented in springboot2 and springboot3, we will also discuss about the change in springboot3 with respect to spring security.
So lets begin -
json web token aka jwt is a way to authorize a user to access certain endpoint and maintain the session for a particular time period.
jwt falls in oauth family and provide robust security to our endpoints.
lets see why its robust and hard to mimic the token
JSON web token has three part -
Header :
this provide two attributes, one attribute contains the desired name, which is totally depends on user, and another attribute contains the type of algorithm used to generate the hash value such as HS512, RS512 etc.
Payload :
this section contains few information about the request such as customerId, requestId, name etc. it depends on project requirement and its customizable, it is discouraged to send sensitive information in this section.
Signature :
In this section we generate an encrypted token value by encrypting header, payload and server/program secret kay using the algorithm provided in header section.
Lets checkout the steps followed to include Json Web Token (jwt) authorization in SpringBoot project
include following dependency in the build.gradle or pom.xml (get the dependency from maven central)
// to support security and authorization in the project
implementation 'org.springframework.boot:spring-boot-starter-security'
// for json web token library
implementation 'io.jsonwebtoken:jjwt:0.9.0'
// for json support/binding
implementation 'org.json:json:20160810'
implementation 'jakarta.xml.bind:jakarta.xml.bind-api:2.3.2'
create a config class with the name of your choice, here we have used WebSecurityConfigure which has extended WebSecurityConfigurerAdapter class and override configure method, In configure method we have provided endpoint which is responsible to generate the token
Now create a class with the name of your choice, here in the demo project we have used JWTAuthorizationFilter which extends OncePerRequestFilter (as name suggest, it guarantees a single execution per request) and override doFilterInternal method, doFilterInternal method is responsible to validate the token, the validation process includes validation of secret key, validation of signature, expiry date/time etc. and return success or failure based on the outcome of token validation.
In the last step we have to write code to create the token, when request comes to the endpoint (/user) mentioned in the configure method of WebSecurityConfigure class, we start creating the token with the help of JWT interface and its builder class by providing various information such as id, name, signature, secret key, expiration date, creation date etc.
here implementation is done, now lets check how control flows in springboot project -- when request comes to create the token
-- when request comes for other resources
when a jwt based springboot project starts running, internally it sets up the security parameter, and allow only endpoint (/user) mentioned in configure method of WebSecurityConfigure class to create the token, basically whichever rule we set in WebSecurityConfigure class, gets implemented during startup
Now fire a request to the endpoint which is responsible to create/return the token (in the sample project it is /user)
Lets checkout postman screenshot for more details -
To create Post request for generating jwt token, go to Body tab, select x-www-form-urlencoded and put username password (optional in our project for simplicity), select method type as Post and submit the request.

once we post the request, it executes the method which is attached with the endpoint (/user) and creates jwt token by providing various information such as id, name, signature, secret key, expiration date, creation date etc. with the help of JWTs interface
and return the result as below --
{
"user": "rohit",
"pwd": null,
"token": "Bearer eyJhbGciOiJIUzUxMiJ9.eyJqdGkiOiJ0ZWNoTWF6ZSIsInN1YiI6InJvaGl0IiwiYXV0aG9yaXRpZXMiOlsiUk9MRV9VU0VSIl0sImlhdCI6MTY3NDMxNjIxMCwiZXhwIjoxNjc0MzE2ODEwfQ.2bSnUTYshkog1p8dVyYjSvgPQVidYvl2crWwd4MlMzQ_XnBen6pVszQdEiu549n-1zx5lFrIVcI81g9xd5dgXg"
}
every token comes with an expiry date/time, once that duration over token also invalidated by JWT, hence if we call other endpoint with the expired token, it will throw error.
Now whenever we access any endpoint other than /user, we have to pass this token as bearer token else it will return 403 forbidden, unauthorized.
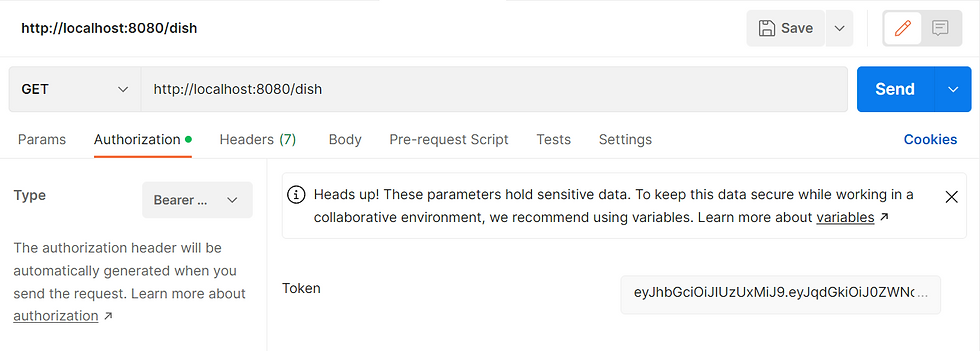
Above screenshot depicts, when we access /dish endpoint with valid bearer token , it proceeds in following manner
it first check if the type of token is bearer, if yes then it proceed for validation of token, else reject the request
in the validation process it validates secret key (defined by us while creating the token) and parse the token data, if token data contains the information which we have provided while creating the signature such as secret, generated signature, header, payload etc. then request will be processed successfully else returns 401 unauthorized or 403 forbidden.
All these steps are taken care by JWT Claim which is nothing but Json Object used in JSON Web Signature (JWS) structure or JSON Web Encryption (JWE) structure
Note -
Above steps and code will work with springboot < 3 version but if we go for the springboot>=3 version, we have to modify our code specially security configuration class because of following reason (link provided at the end for the sample project)
1. class WebSecurityConfigurerAdapter is no more supported and obsolete, hence we don't have to extend this class instead we have to use SecurityFilterChain
2. authorizeRequests method has changed to authorizeHttpRequests
3. instead of using antMatchers or regex , we have to use requestMatchers
That's all folks in this article, hope this will help at some extent to understand Json Web Token, keep visiting, feel free to share this article, your suggestion/thoughts or any other approach in comment section.
For more details please have a look in the below GitHub project
For springboot2 and jdk 11 --
Git location for the demo : https://github.com/rohitmodi07/springboot-jwt-oldway
For springboot3 and jdk 17 --
Git location for the demo : https://github.com/rohitmodi07/springboot-jwt-latest
A Big thank you for checking out my article, this really encourage me to come up with more topics.
Here are some resources you might be interested ------------------------


Commenti